Selfhosted Deploy
Pre-requisites
A VPS (Debian 11 for example, vps outside the mainland China is recommended, servers in the mainland China need to be checked by ICP before they can use port 80 and 443)
A domain name
1. Video version
Coming soon.
2. Text Version
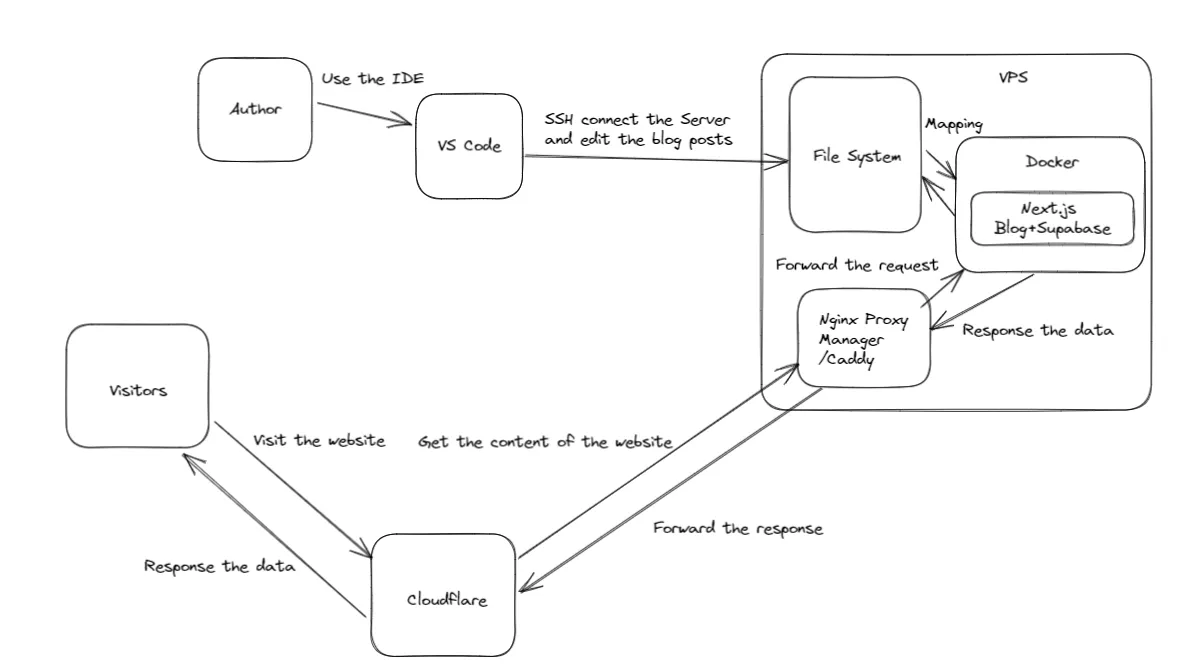
2.1. Selfhosted Project Architecture

2.2. Steps
a. Install curl tool, take Debian as an example
apt install curl -y
b. Install docker and docker compose
curl -fsSL https://get.docker.com | sh
c. Self-hosted supabase (for storing comment data)
See supabase docker deployment documentation for more details Or see this youtube instructional video—Self host Supabase with an Ubuntu Server on Digital Ocean
Note: The notes version adds the installation of caddy, reverse proxy supabase, process of protecting supabase studio, recommended reading.
d. Build and deploy with docker
Q: Why don't you provide a dockerhub image and pull it directly for deployment?
A: Because Next.js will inline environment variables starting with NEXT_PUBLIC_ into the docker image when building the docker image, which will cause the environment variables in .env file to not load into the docker container at all.
Although there are solutions on the web such as adding entrypoint.sh, these solutions are either tedious or require sacrificing the performance of Next.js (which converts static generation to server-side rendering),
so it is safer to build your own docker image and deploy it with docker compose.
# Clone git repository
git clone https://github.com/simple-is-awesome/simple.git
# Go to the folder
cd simple
# Rename the file
mv .env.example .env
# Build a docker image named "blog"
docker build -t blog .
# Start and run the docker container as defined in the docker-compose.yml file
docker compose up -d
e. Update
# Stop and delete the services (containers) and their related resources defined by the docker-compose.yml file
docker compose down

# Modify .env or secondary development (see below for explanation of modification process)

# Re-create a docker image named "blog"
docker build -t blog .
# Start and run the docker container as defined in the docker-compose.yml file
docker compose up -d
# Force delete all images that are not referenced by a container
docker image prune -af
Parameters of the .env file
Just replace xxxxxxx directly, don't add extra symbols.
# Basic config
# Website url (e.g. https://a.exmaple.com)
NEXT_PUBLIC_SITE_URL=xxxxxx
# Title of the website (e.g. Xiaoming's blog)
NEXT_PUBLIC_SITE_TITLE=xxxxxx
# Description information of the website (e.g., record your study, life, entertainment)
NEXT_PUBLIC_SITE_DESCRIPTION=xxxxxx
# Keywords for the website (e.g. blog, life, xiaoming)
NEXT_PUBLIC_KEYWORDS=xxxxxx
# Bottom information of the website (e.g. © 2023 Made with ❤️ By Xiaoming.)
NEXT_PUBLIC_FOOTER=xxxxxx
# of articles per page of the site (e.g., 10)
NEXT_PUBLIC_POSTS_PERPAGE=xxxxxx
# github repository address of the site (e.g. https://github.com/simple-is-awesome/simple)
NEXT_PUBLIC_GITHUB_REPO=xxxxxx
# Whether the site displays comments (e.g. true)
NEXT_PUBLIC_SHOW_COMMENT=xxxxxx

# Third-party In Integration
# json link to Inoreader's public channel (e.g. https://www.innoreader.com/stream/user/1005341682/tag/user-broadcasted/view/json)
NEXT_PUBLIC_INOREADER_CHANNEL=xxxxxx
# rss link to Raindrop's shared collection (e.g. https://bg.raindrop.io/rss/public/32937900)
NEXT_PUBLIC_RAINDROP=xxxxxx

# OpenAI
# Whether the OpenAI API is accessible (e.g. true)
NEXT_PUBLIC_OPENAI_API_KEY_AVAILABLE=xxxxxx
# API KEY of OpenAI
OPENAI_API_KEY=xxxxxx
# Organization ID of OpenAI
OPENAI_ORG_ID=xxxxxx

# Cloudflare
# Can be created through the Cloudflare backend administration panel of the Turnstile option to get
# Cloudflare Turnstile's site key
NEXT_PUBLIC_CLOUDFLARE_TURNSTILE_SITE_KEY=xxxxxx
# Cloudflare Turnstile's secret key
CLOUDFLARE_TURNSTILE_SECRET_KEY=xxxxxx

# Email
# Can be used for comment reply email notifications
# Mailbox username (如[email protected])
EMAIL_USERNAME=xxxxxx
# Mailbox authorization code (can be obtained by opening smtp service inside the mailbox settings)
EMAIL_PASSWORD=xxxxxx
# Mailbox SMTP server address (such as: smtp.qq.com)
EMAIL_HOST=xxxxxx
# mailbox port (such as: 465)
EMAIL_PORT=xxxxxx
# Whether to encrypt the mailbox when it sends emails (e.g. true)
EMAIL_SECURE=xxxxxx

# Supabase
# Service role key for Supabase project (see SERVICE_ROLE_KEY in supabase/docker/.env)
SUPABASE_SERVICE_ROLE_KEY=xxxxxx
# Anonymous role key for Supabase project (see ANON_KEY in supabase/docker/.env)
NEXT_PUBLIC_SUPABASE_ANON_KEY=xxxxxx
# API URL for Supabase project (e.g. https://api.supabase.exmaple.com, see the tutorial in self-hosted supabase)
NEXT_PUBLIC_SUPABASE_URL=xxxxxx
f. The reverse proxy server—caddy settings
Edit /etc/caddy/Caddyfile
demo.example.com {
    reverse_proxy localhost:3001
}
Reload caddy
systemctl reload caddy
g. Writing a blog
Create a new md or mdx file in the posts folder.
Follow the frontmatter as shown below(showtoc is optional and others are required):
---
title: "GitHub Flavored Markdown syntax"
date: "2023-03-30"
tags: ["github", "markdown"]
slug: "github-flavored-markdown"
summary: "Summary of GitHub Flavored Markdown syntax"
showtoc: true
---
h. Repeat the update step
# Stop and delete the services (containers) and their related resources defined by the docker-compose.yml file
docker compose down

# Modify .env or secondary development (see below for explanation of modification process)

# Re-create a docker image named "blog"
docker build -t blog .
# Start and run the docker container as defined in the docker-compose.yml file
docker compose up -d
# Force Delete all images that are not referenced by a container
docker image prune -af
After done the scripts above, visit https://demo.exmaple.com to access the blog containing your latest post.