Vercel Deploy
Vercel is a platform for deployment of front-end projects(now has evolved to front-end cloud), which is very suitable for deploying the Next.js app.
You can find more information in Vercel website.
1. Video Version
Coming soon.
2. Text Version
- a. Click on the vercel one-click deployment button below.
Note: You can choose a GitHub account to log in, after it will need your cell phone number to verify.
- b. Uncheck Create private repository, enter the repository name, and click Create.
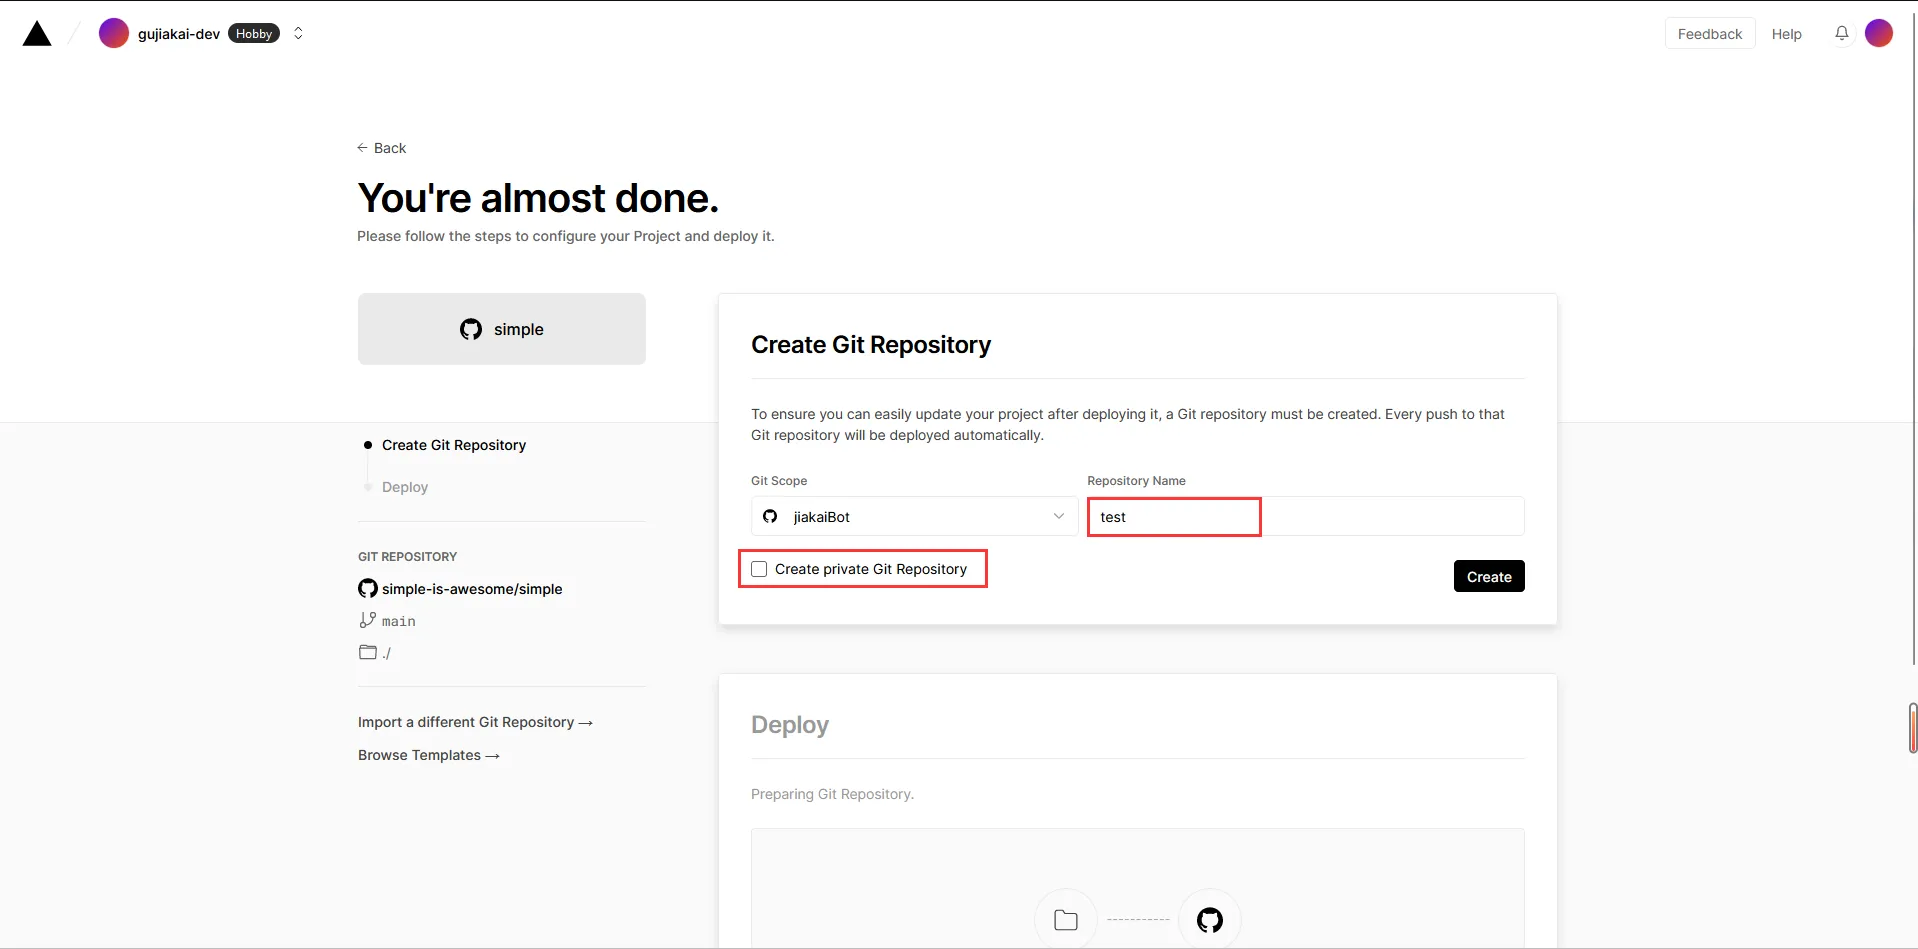
- c. vercel will automatically recognize the project and start automatic deployment, wait patiently for the deployment to complete.
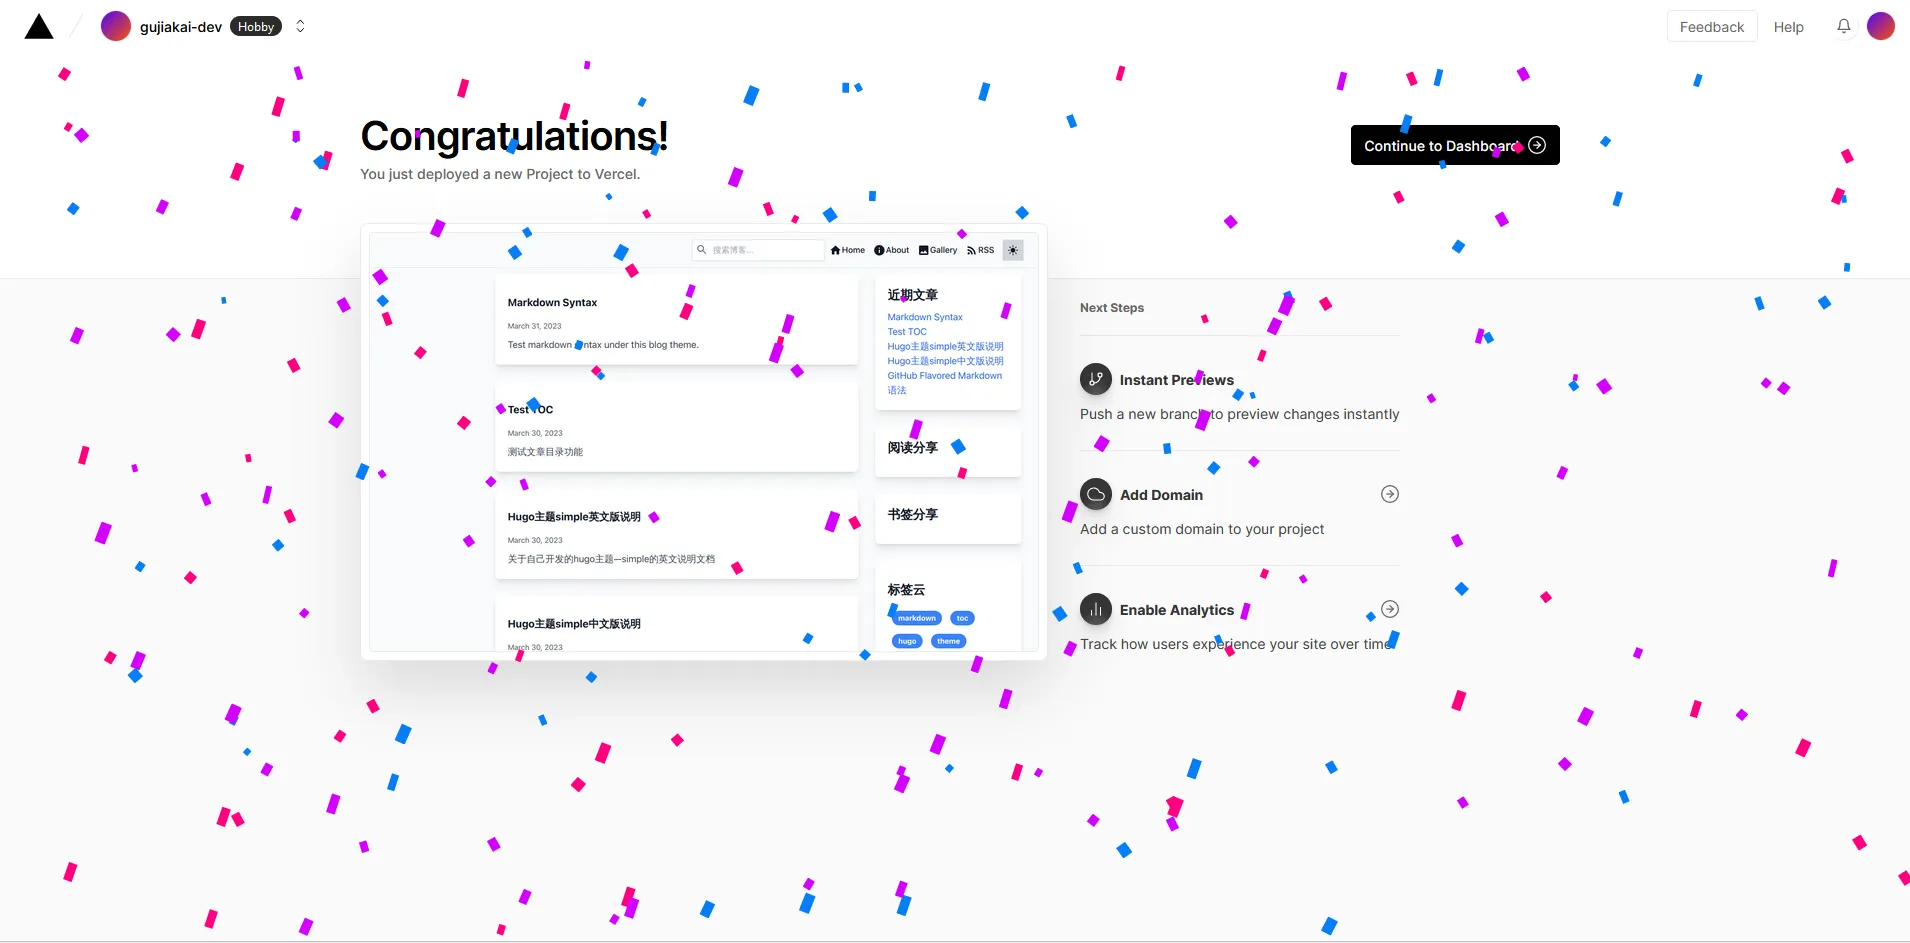
- d. Set custom domain name.(This step is recommended to watch the video version)
Click Settings->Domains in the vercel project, fill in the corresponding domain name, and then add a CNAME record in the domain hosting platform.
- e. Set the environment variables.(This step is recommended to watch the video version)
Come to the Setting option of the project and set the environment variables.
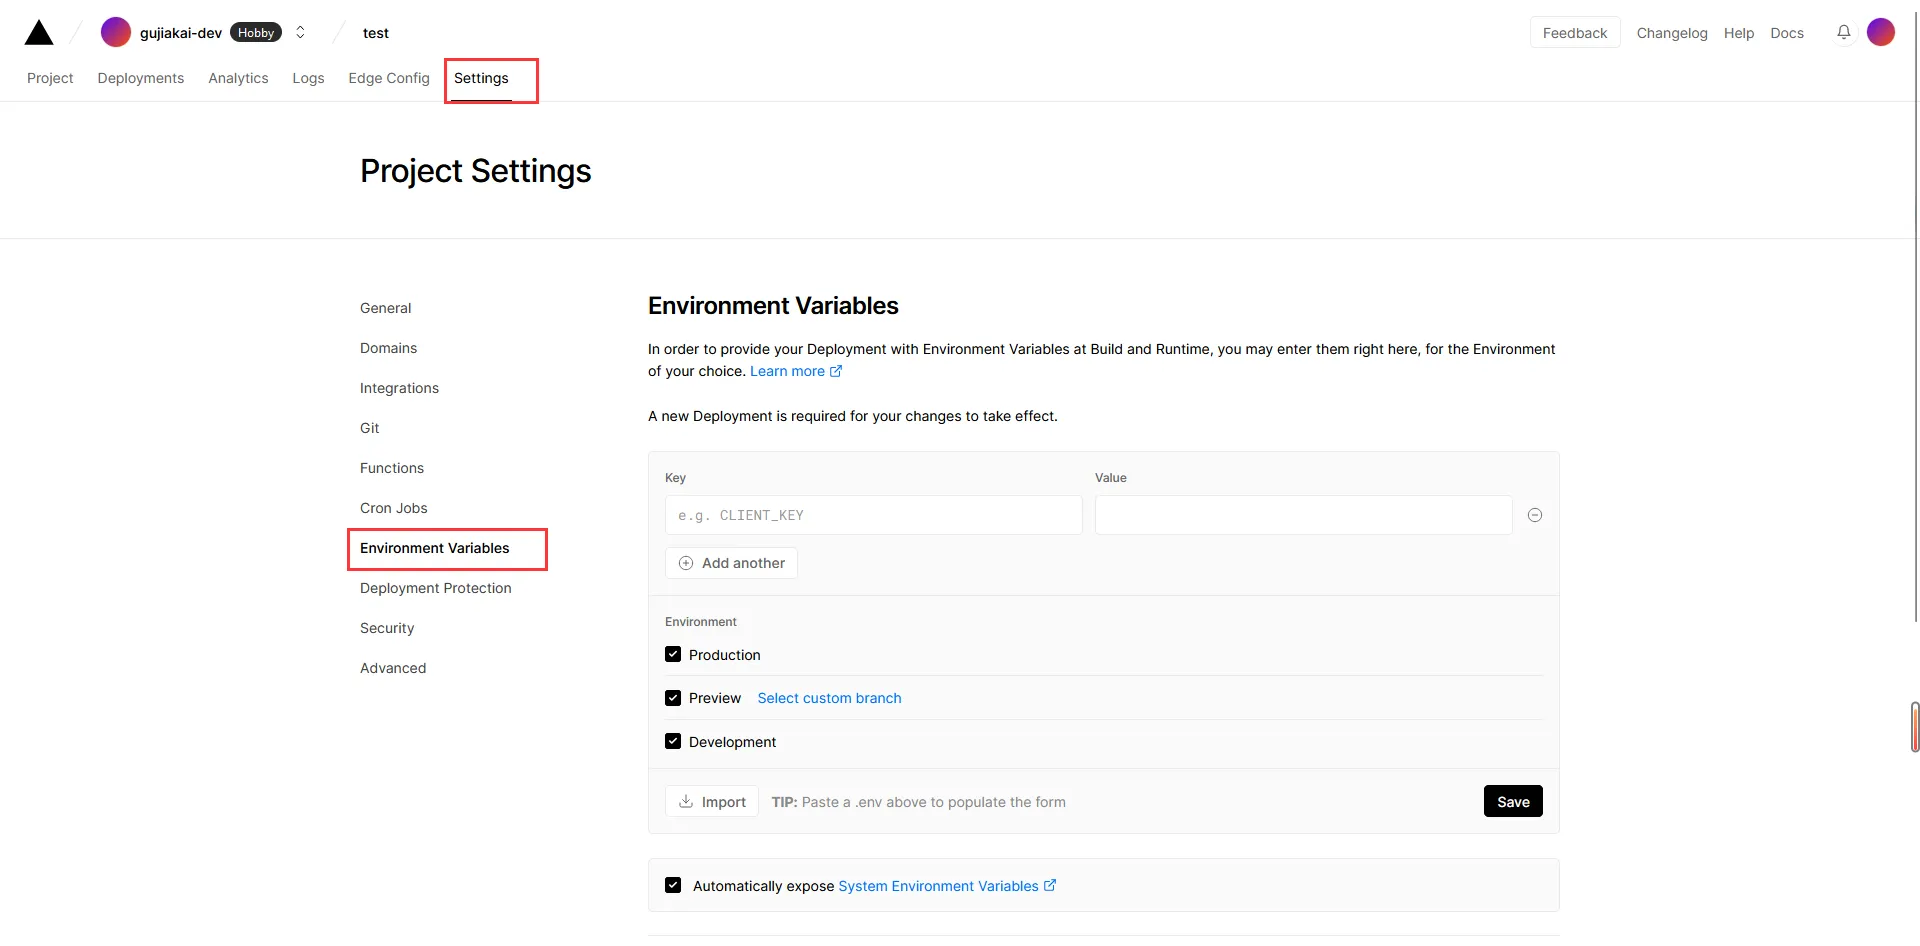
Add the following environment variables. For example, fill the Key with NEXT_PUBLIC_SITE_TITLE, Value with test, and the title of website will become test.
You can add the environment variables with the examples below, the last part of environment variables named supabase can be filled later.
# Basic config
NEXT_PUBLIC_SITE_URL=https://test-vercel.njxzc.top
NEXT_PUBLIC_SITE_TITLE=test-vercel
NEXT_PUBLIC_SITE_DESCRIPTION=test vercel deploy
NEXT_PUBLIC_KEYWORDS=test, vercel,blog
NEXT_PUBLIC_FOOTER=Made with ❤️ by jiakai
NEXT_PUBLIC_POSTS_PERPAGE=10
NEXT_PUBLIC_GITHUB_REPO=https://github.com/jiakaiBot/test
NEXT_PUBLIC_SHOW_COMMENT=true

# Third-party In Integration
NEXT_PUBLIC_INOREADER_CHANNEL=https://www.inoreader.com/stream/user/1005341682/tag/user-broadcasted/view/json
NEXT_PUBLIC_RAINDROP=https://bg.raindrop.io/rss/public/32937900

# OpenAI
NEXT_PUBLIC_OPENAI_API_KEY_AVAILABLE=true
OPENAI_API_KEY=sk-fomH3XrbFFmUxnVjq9yCT3BlbisoapQtflVFKCeu1eFysbat9Dj
OPENAI_ORG_ID=org-xQYSuej4Mv0FrPbnasyahcl7G25

# Cloudflare
NEXT_PUBLIC_CLOUDFLARE_TURNSTILE_SITE_KEY=0x4AAAAAAAEvHDZcVcsicussya
CLOUDFLARE_TURNSTILE_SECRET_KEY=0x4AAAAAAAEvHKOsicuuakaKk5vJd0lVKo05A0CHw

# Email
[email protected]
EMAIL_PASSWORD=pscssaavtvpqcbtkdjdj
EMAIL_HOST=smtp.qq.com
EMAIL_PORT=465
EMAIL_SECURE=true

# Supabase
SUPABASE_SERVICE_ROLE_KEY=eyJhbGciOiJIUzI1NiIsInR5cCI6IkpXVCJ9.eyJpc3MiOiJzdXBasASFzZSIsInJlZiI6InNucXZ1c2prZnJjanpycXNkd3NpIiwicm9sZSI6InNlcnZpY2Vfcm9sZSIsImlhdCI6MTY4NDExNzsadasdasdahwIjoxOTk5NjkzMjExfQ.e97hLapcZEHPpvhndOIhrGwypsWLEZbh0-DlP3zqNcs
NEXT_PUBLIC_SUPABASE_ANON_KEY=eyJhbGciOiJIUzI1NiIsInR5cCI6IkpXVCJ9.eyJpc3MiOiJzdXBhYmFzZSIsInJlZiI6InNasdasd1c2prZnJjanpycXNkd3NpIiASasm9sZSI6Iasdasdasd24iLCJpYXQiOjE2ODQxMTcyMTEsImV4cCI6MTk5OTY5MzIxMX0.S-VTYgI30wg2bRwO9HnpS1_FpAgapeZ962X7oVoZoEU
NEXT_PUBLIC_SUPABASE_URL=https://snqvusjdarcjzrqsdwsi.supabase.co
where 1~8 are required, these 8 environment variables are the basic information of the website.
9~10 (Inoreader and Raindrop integration) are optional. If you don't fill them in, the right sidebar of the homepage of the website will not show the links shared by Inoreader and Raindrop.
11~13 optional, this part of the environment variables need your openai key, ask chatgpt || newbing || google for specific details. The specific function is to integrate chatgpt to summary article on the left side of each article to help visitors quickly filter information.
14~15 optional, this part of the environment variables need your Cloudflare Turnstile Site key and Secret key. function to prevent robots to submit comments.
16~20 optional (if not open the comment section then no need to fill in, open the comment section recommended to fill in), this part of the environment variables need your email address and authorization code. The function is to send comment email alerts to all parent comment visitors' emails when there are child comments.
21~23 optional (not required if the comments section is not open), this part of the environment variables can be obtained in the supabase API page, the function is to provide comment section data storage and query services.
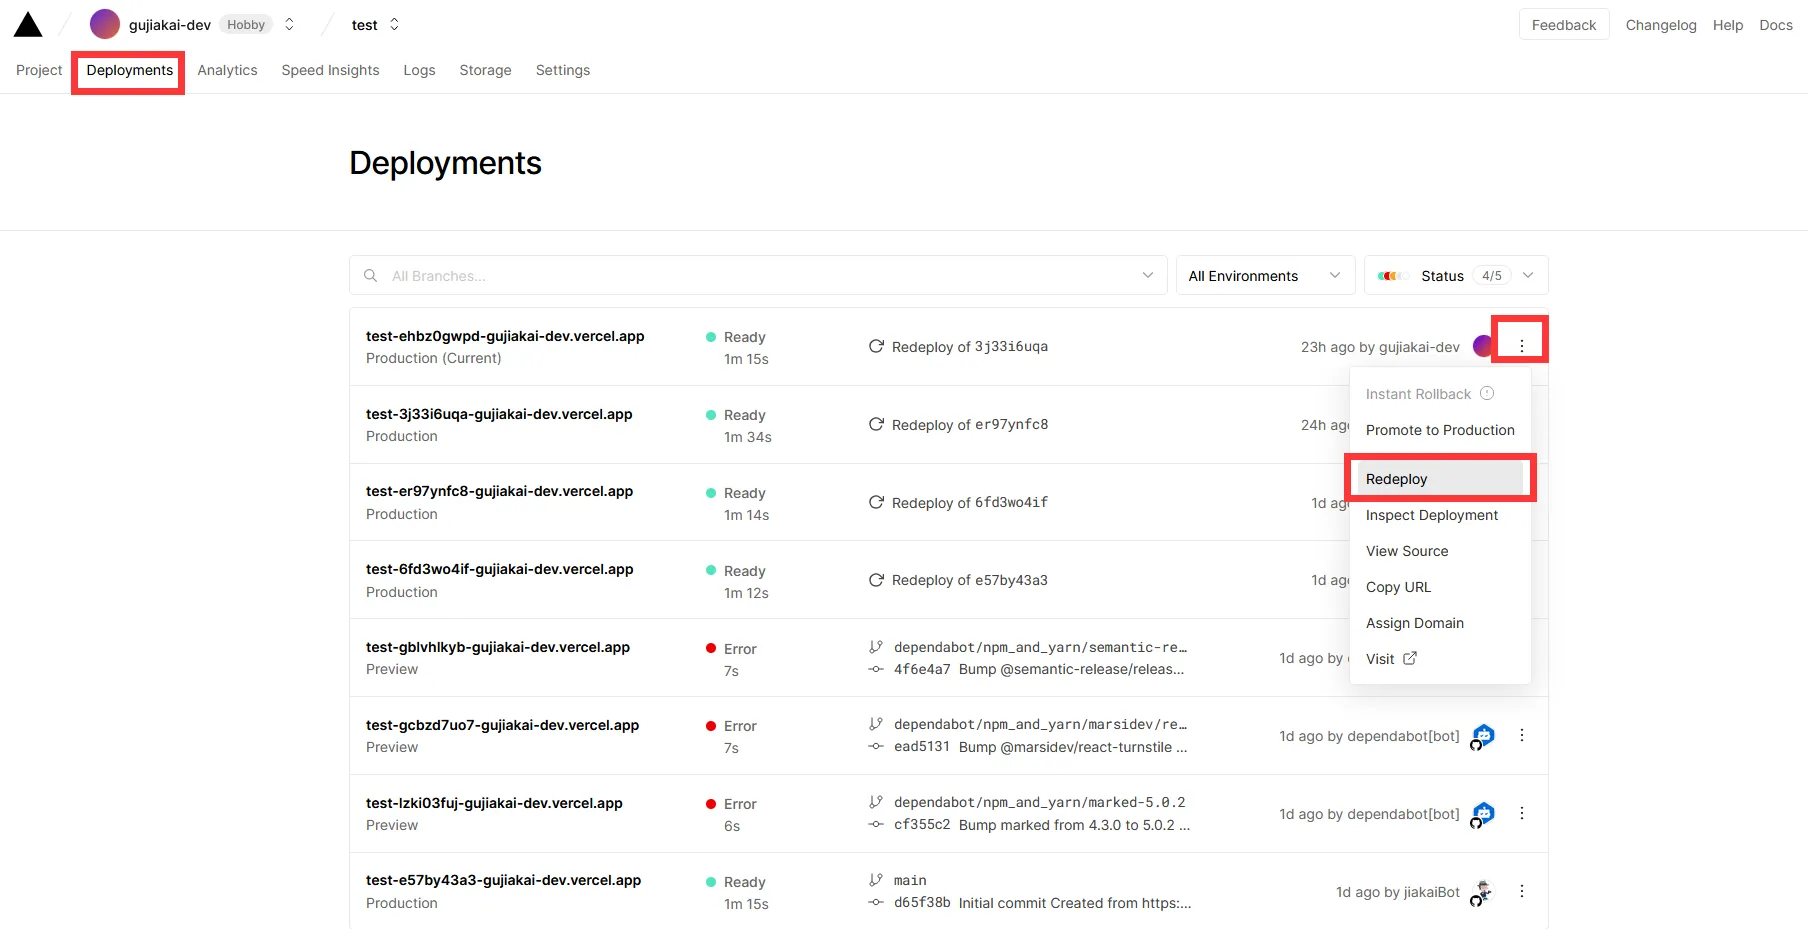
After adding these environment variables, you should redeploy the project to make the environment variables take effect.
- f. New articles
You can open your GitHub repository page and find the repository created in Vercel's deployment.
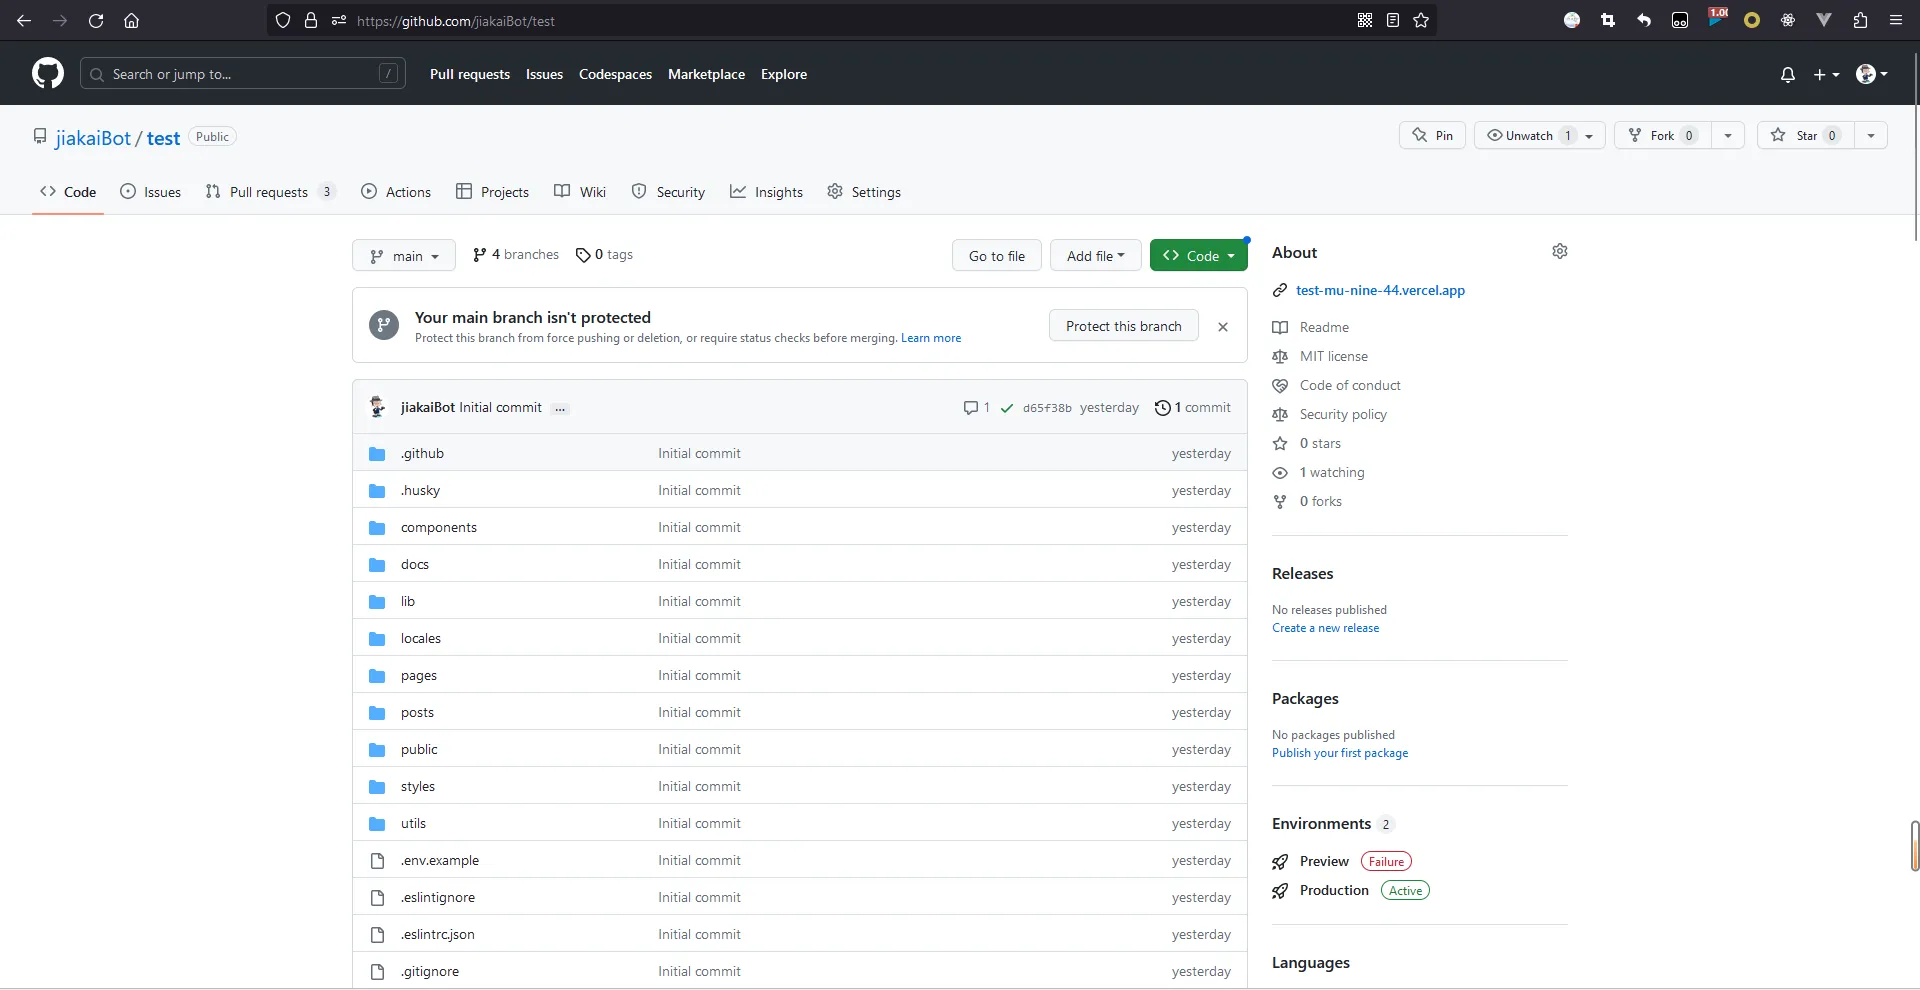
Enter the keyboard . decimal key, using the editor of github.dev, to display the repository file.
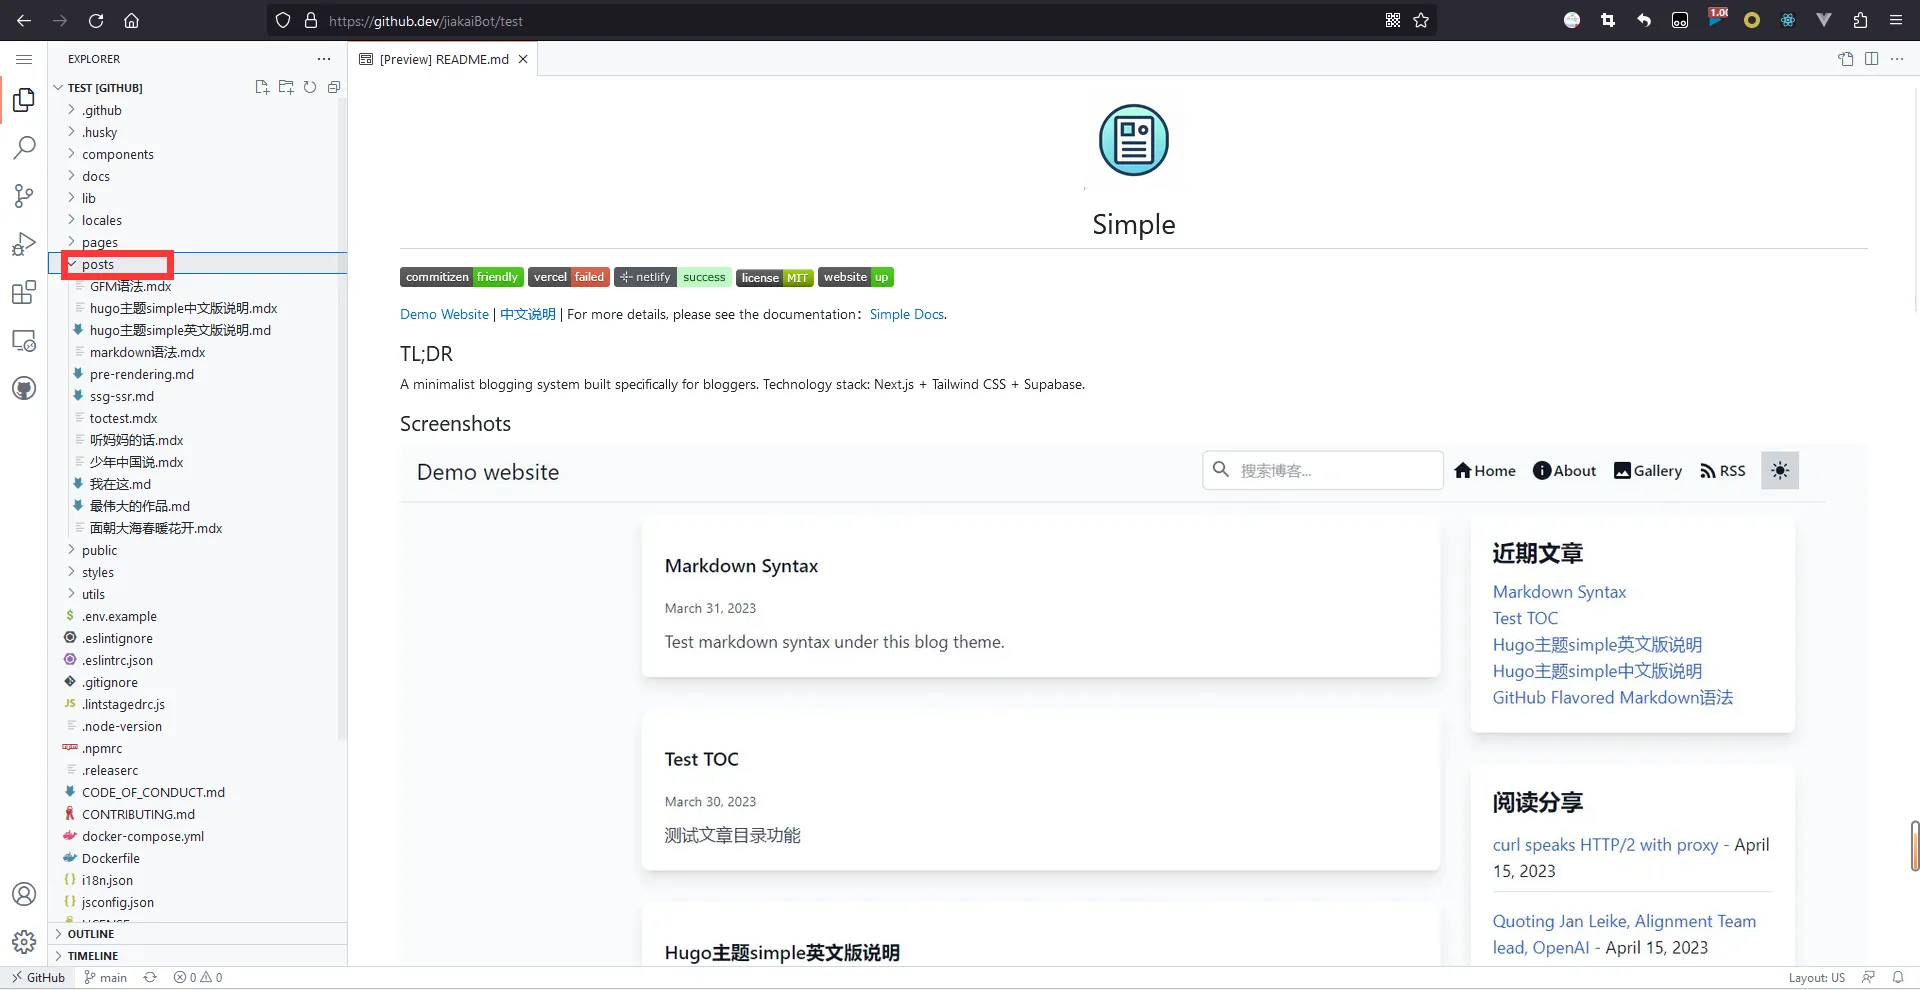
Find the posts folder and create a new md or mdx file in that folder.
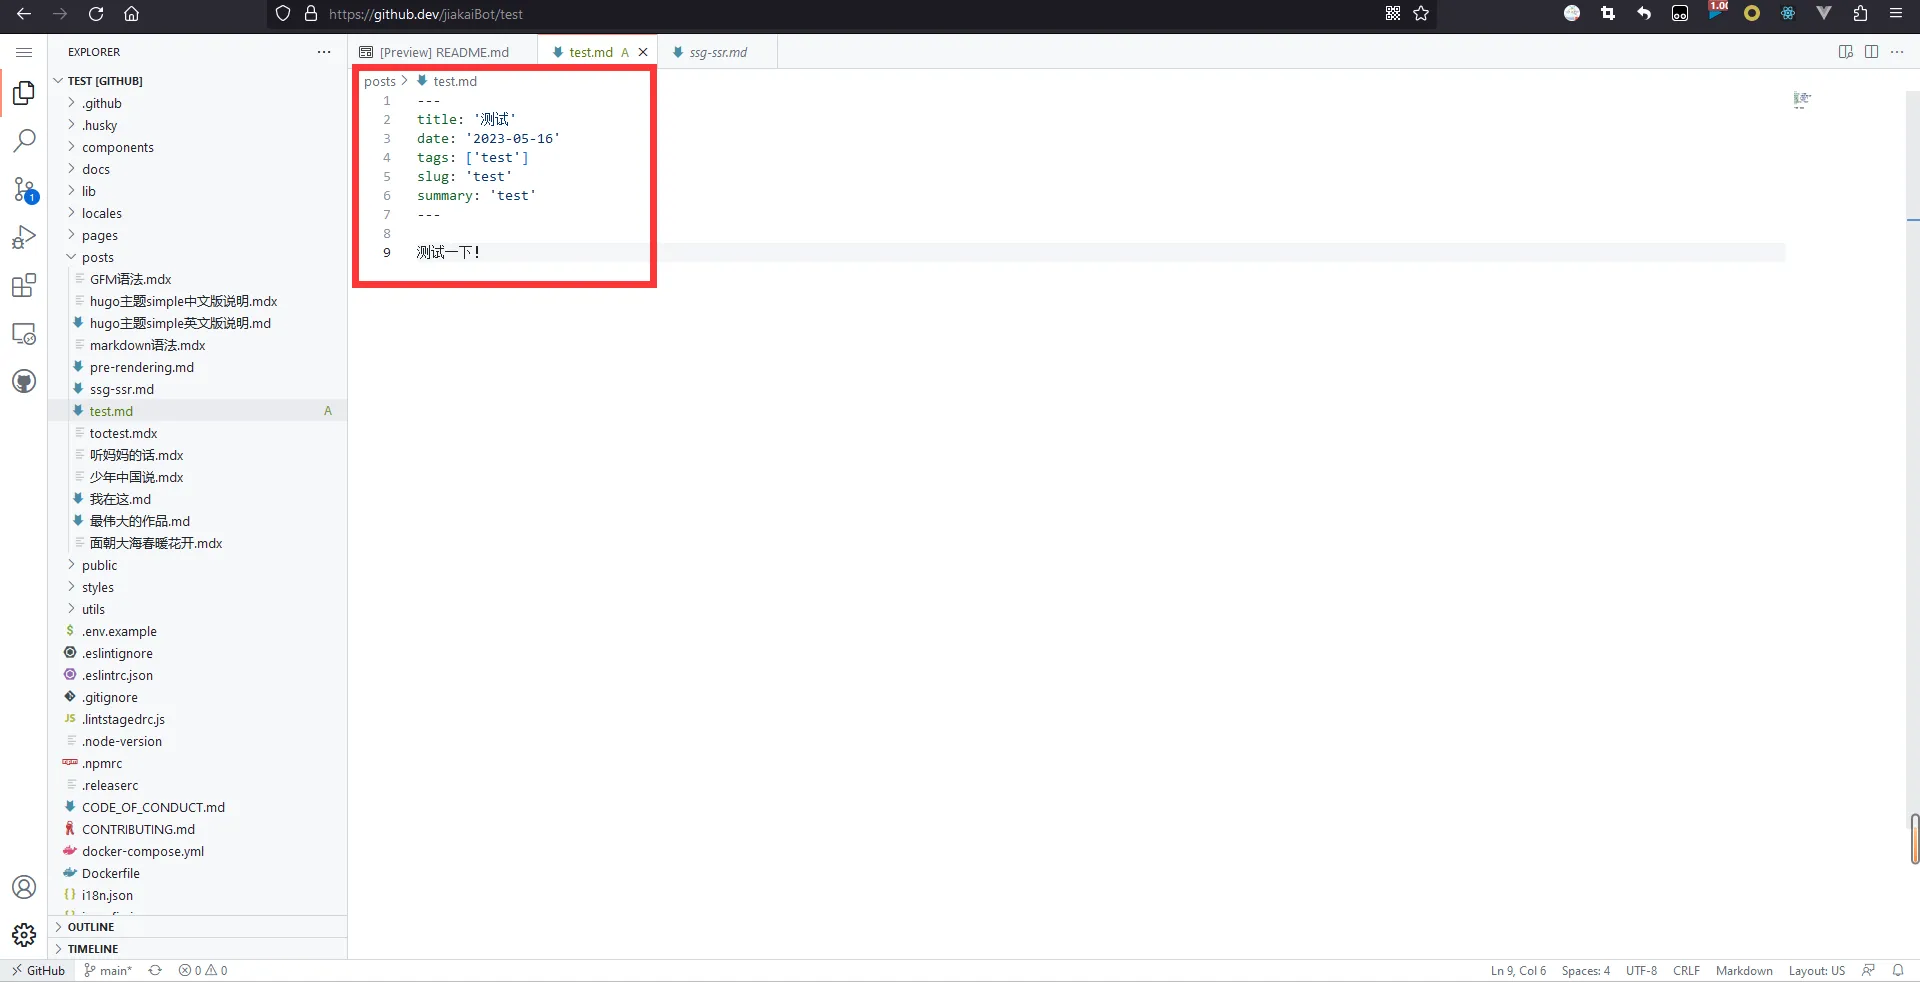
For example, I created a new Markdown file called test.md in the posts folder. and then add frontmatter and text content to this MarkDown file.
example:
---
title: '测试'
date: '2023-05-16'
tags: ['test']
slug: 'test'
summary: 'test'
showtoc: false
---

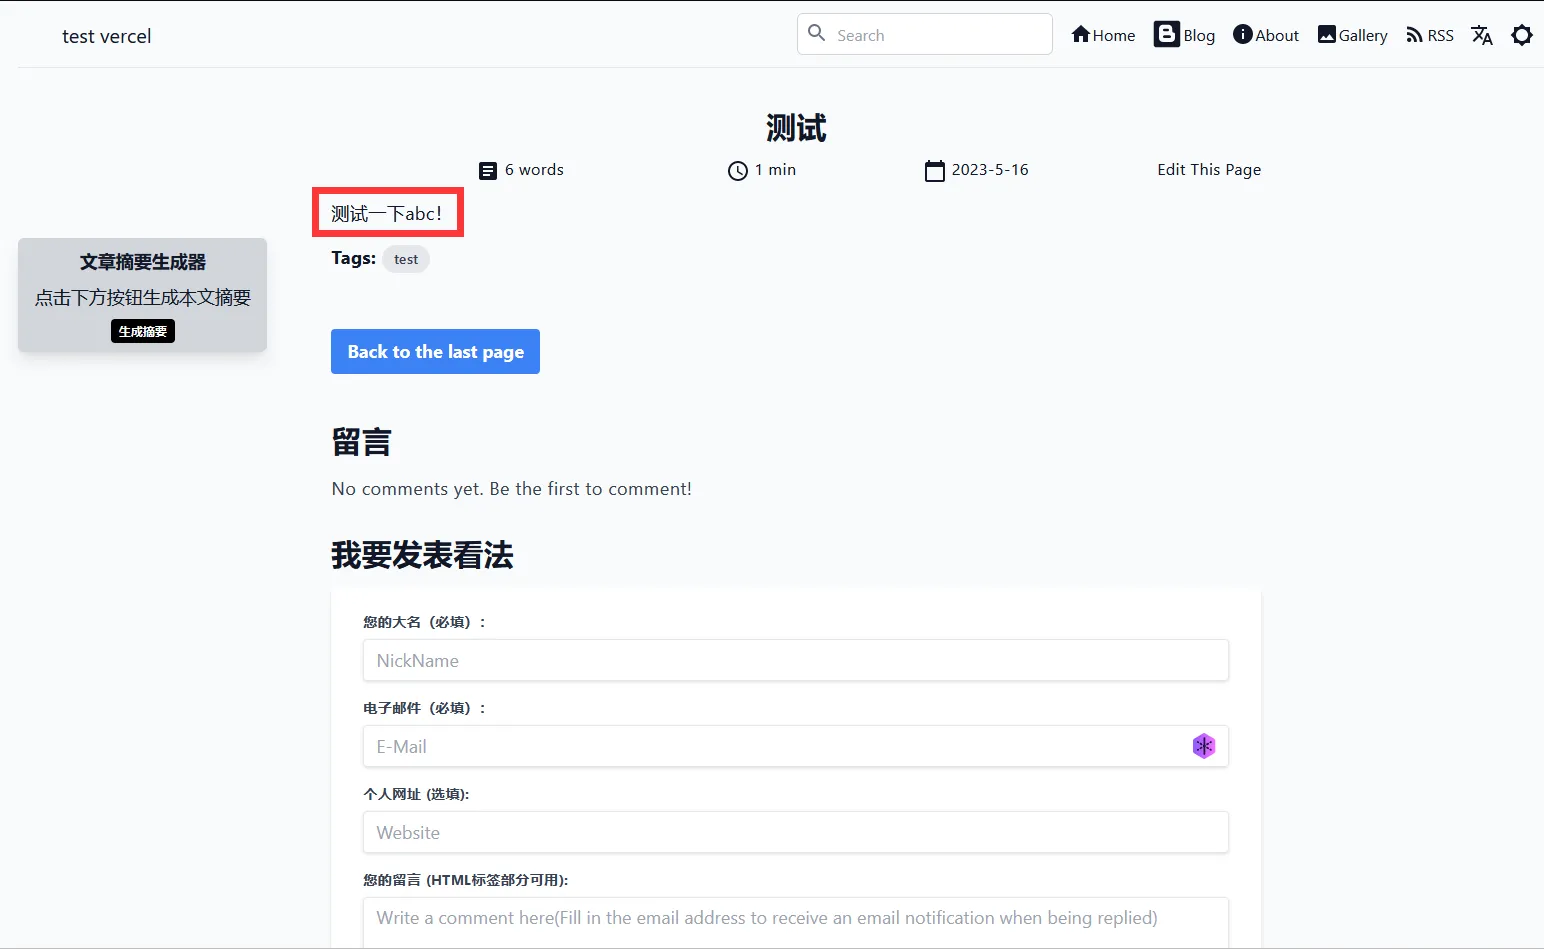
测试一下!
The frontmatter is the article's metadata, which provides the article's title, date, tags, links, summary and other information that you can write on demand. Among them, title, date, tags, slug, summary are required, showtoc optional, if you need to make the article display article toc, you can change the showtoc parameter to true, If you don't add showtoc parameter, the default value is false, it means that don't show the article toc.
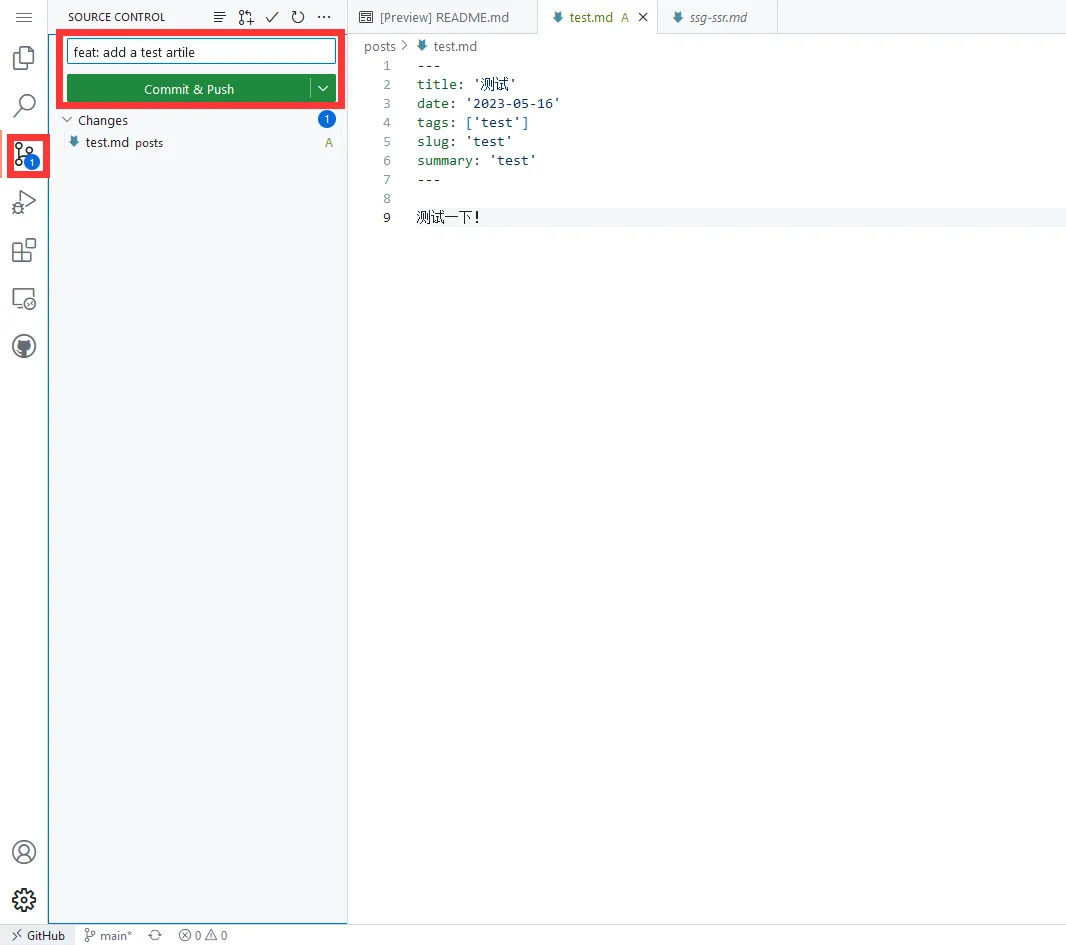
Next, click source code control on the left side of the web-based vscode editor, fill in the commit information, and click Commit & Push to push the newly created article to the GitHub repository.
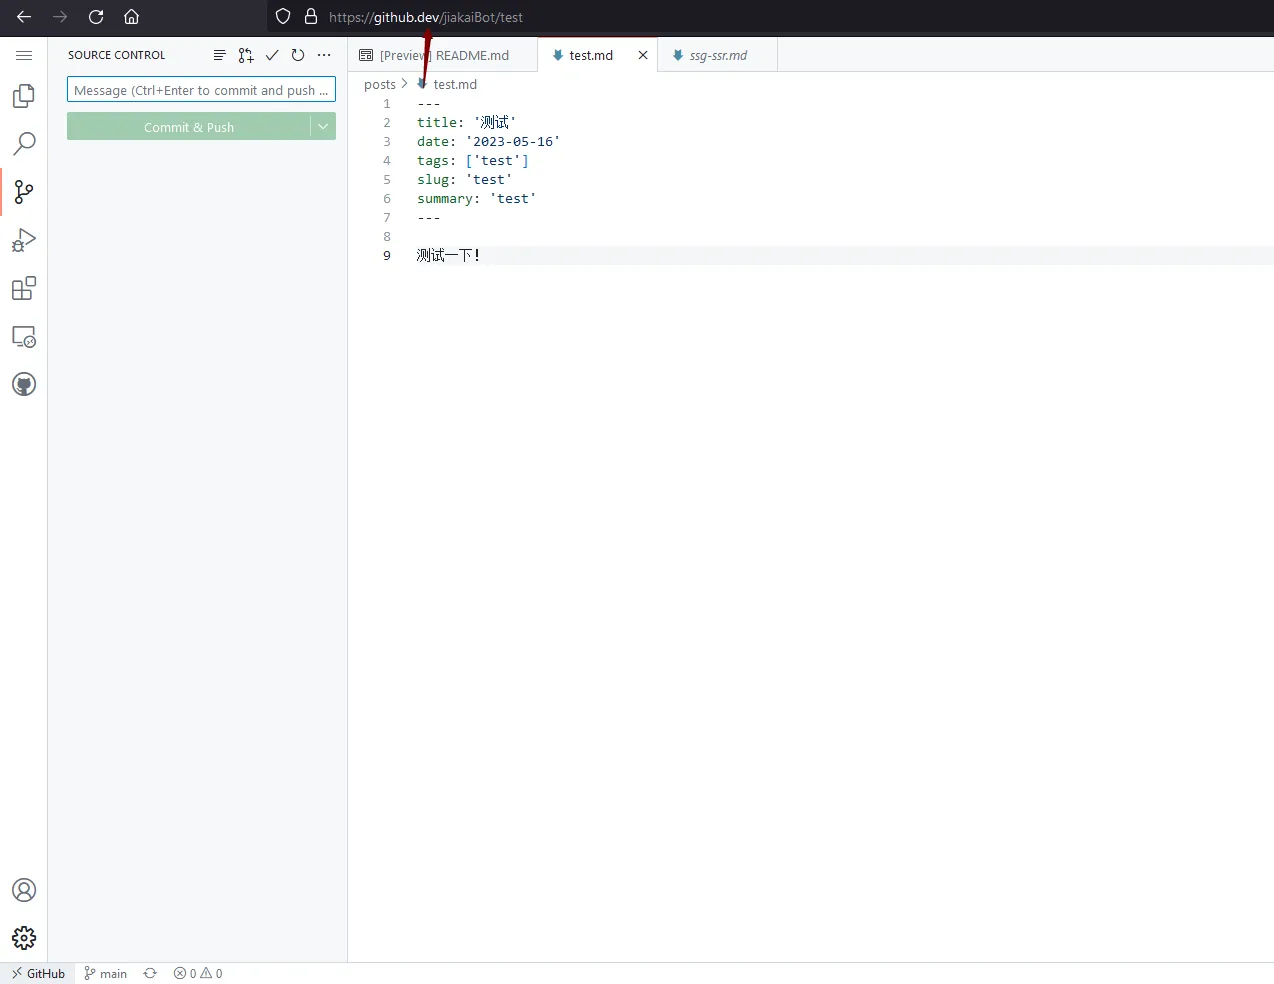
After this, change github.dev to github.com in the browser address bar to return to the original GitHub repository page.
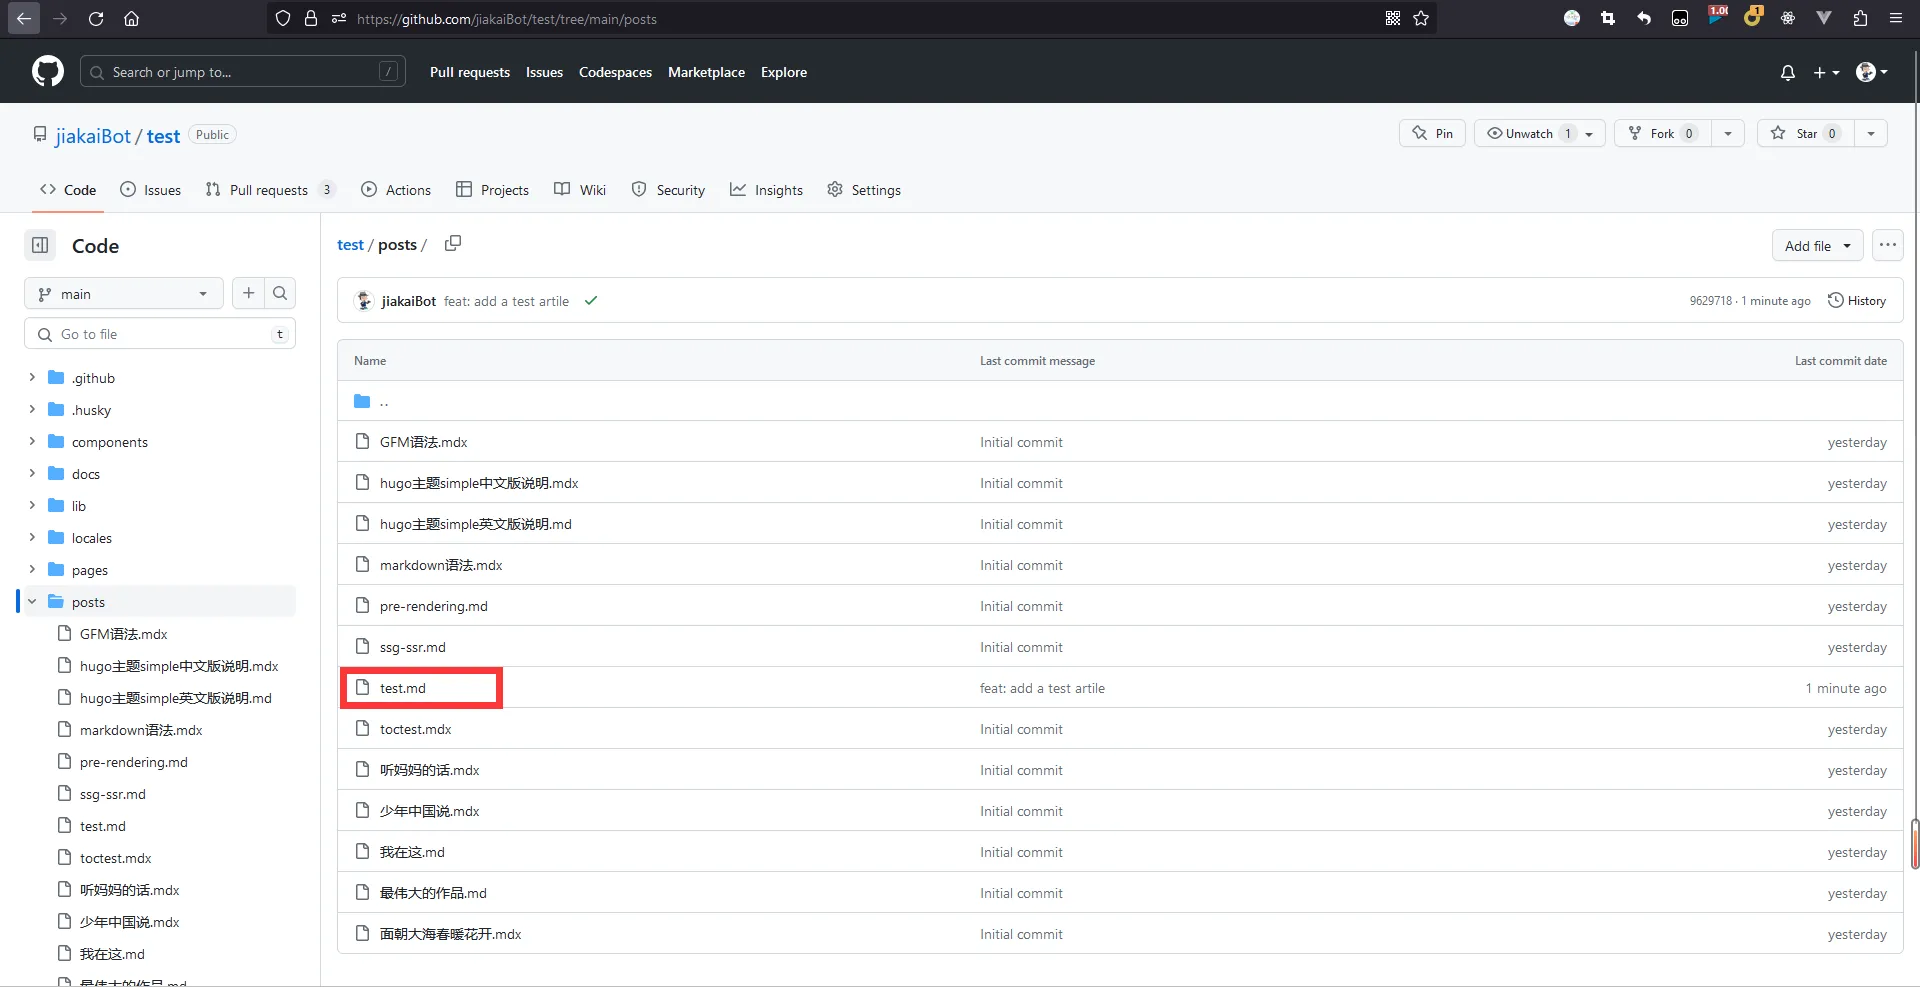
Expand on the posts folder, check the new test.md you just created. The image above shows that it has been successfully pushed to the GitHub repository.
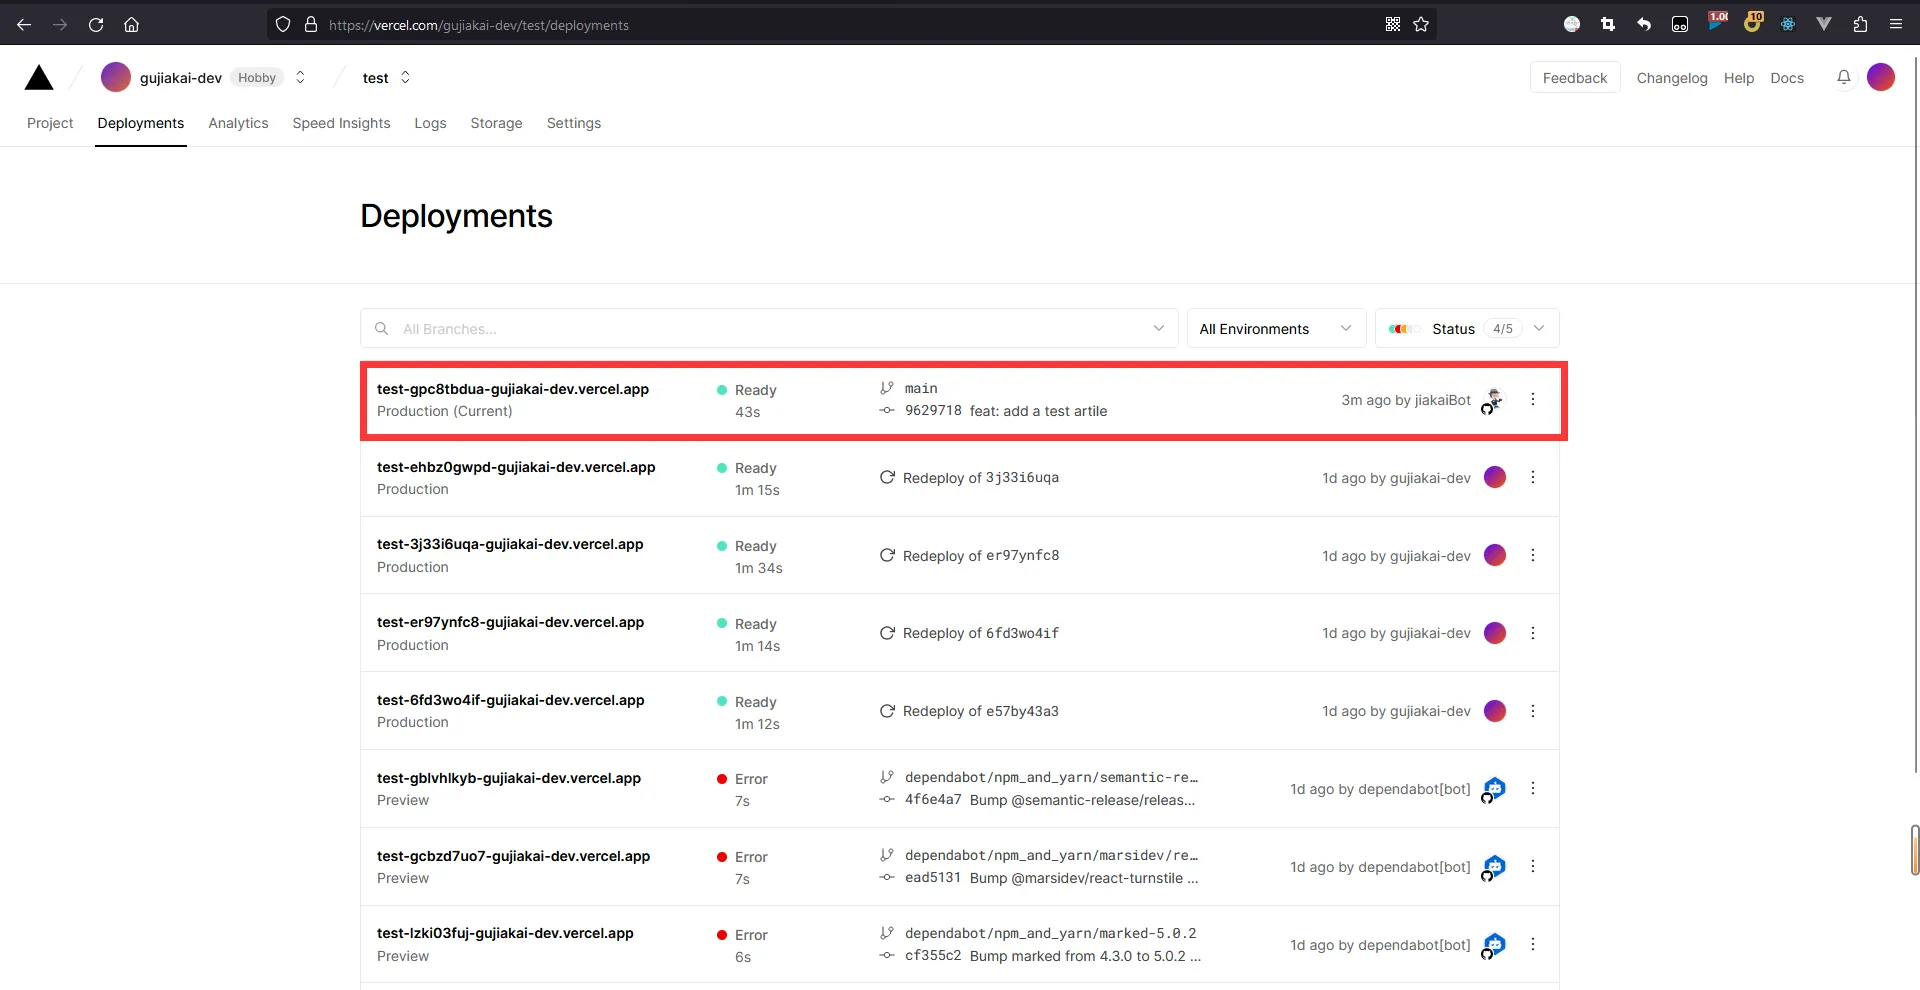
Come to the deployment screen of vercel. You can see that vercel monitored the changes to the repository and triggered an automatic deployment and the site has been deployed automatically.
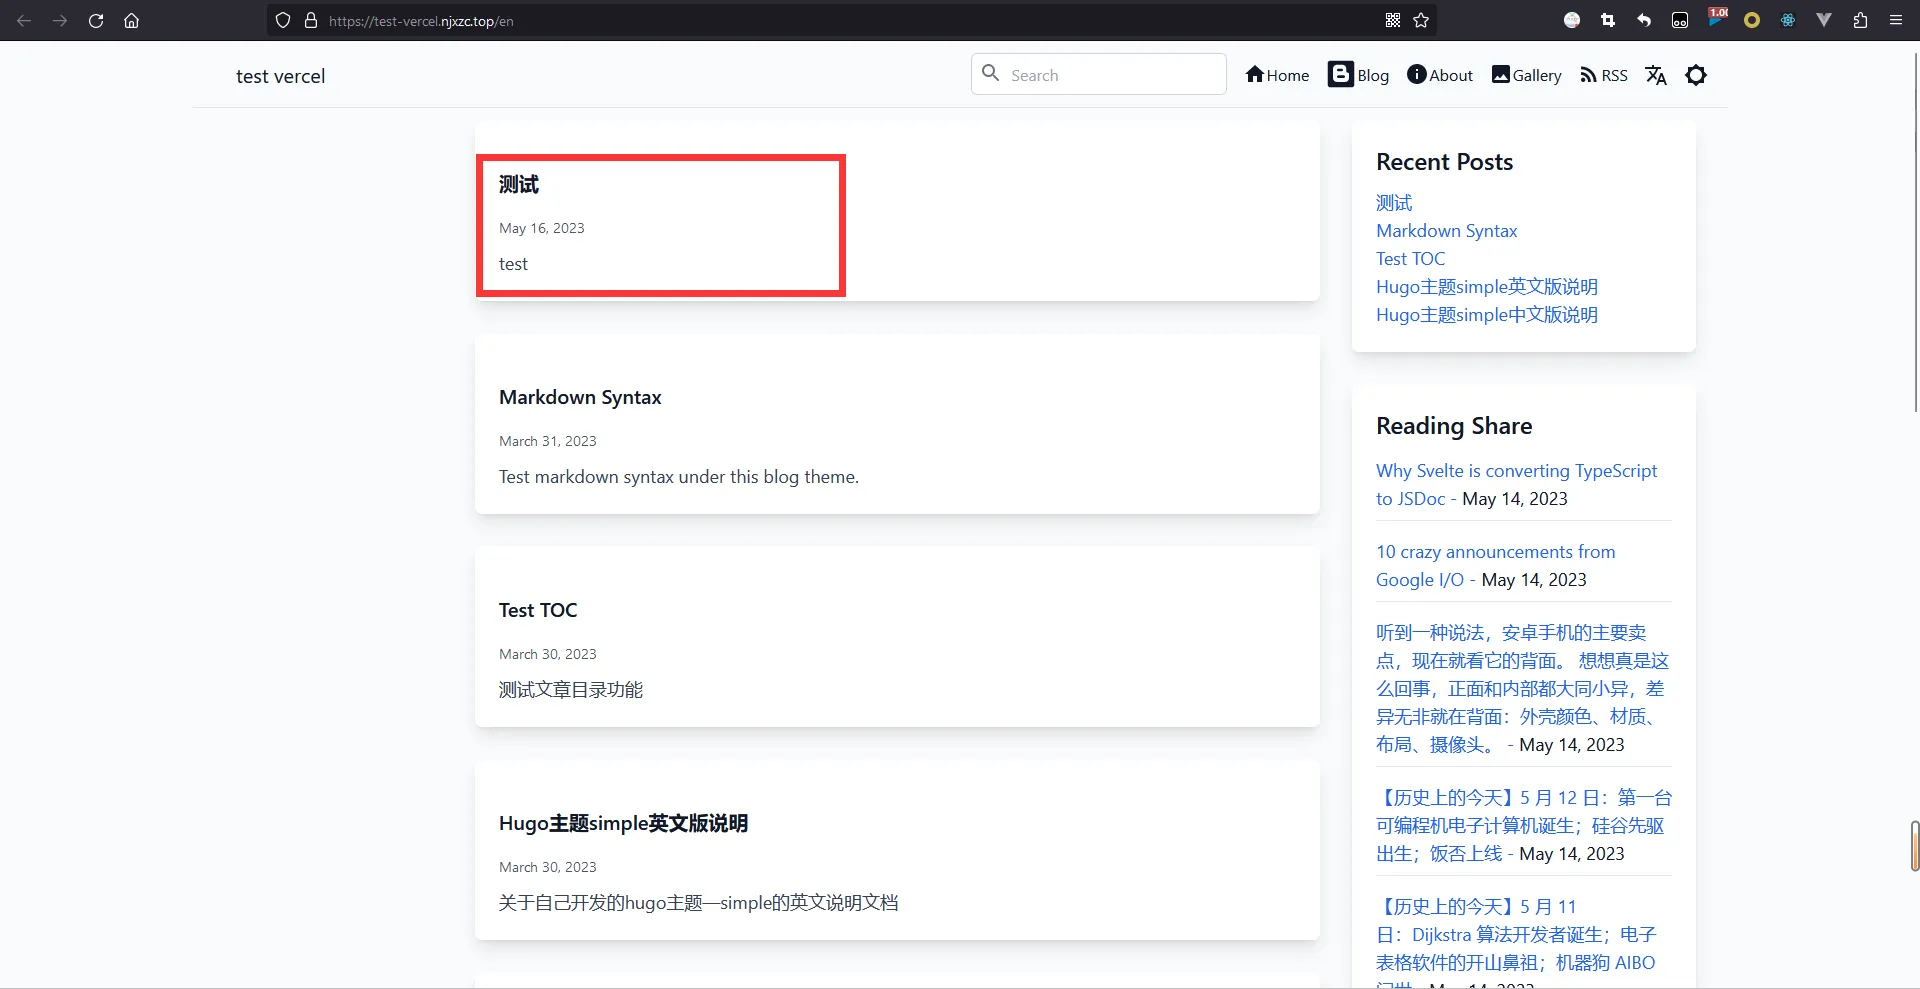
Refresh the site and the article you just added is already displayed at the top.
- g. Delete articles, edit articles
The steps are the same as f, just manipulate the files in the posts folder, in which you can modify the article.
You can go directly to the article page, the first part of each article has a hyperlink to edit the article.
Click on the hyperlink, you can jump directly to the corresponding file page of GitHub.
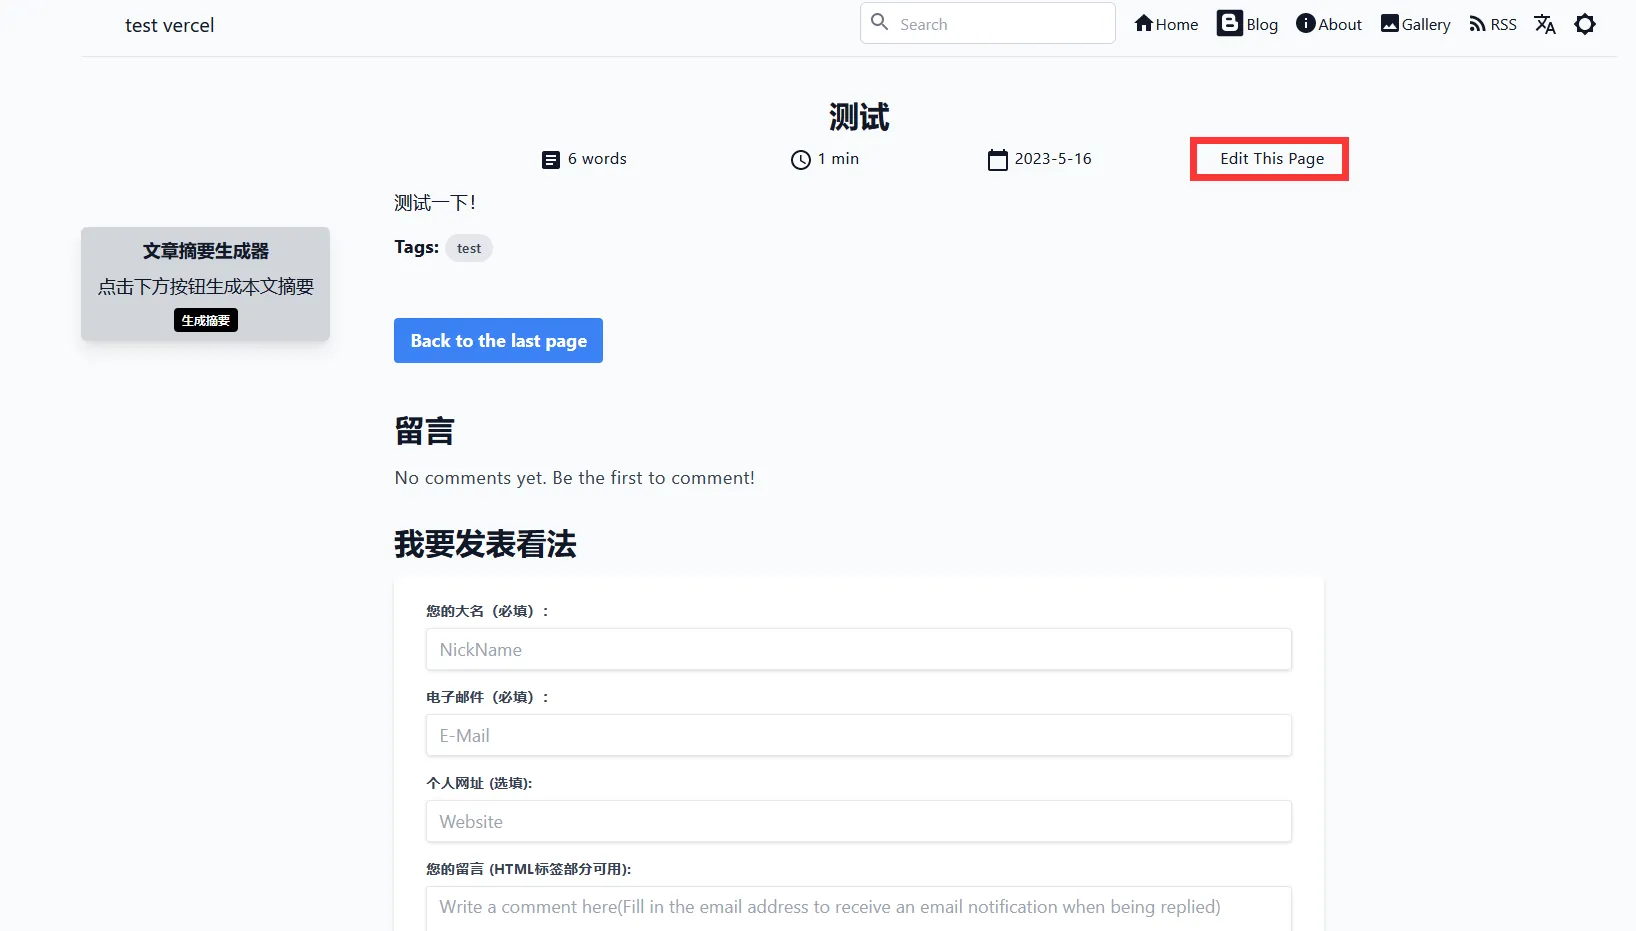
After modifying the article information, then Commit changes, then it will trigger the automatic deployment of vercel.
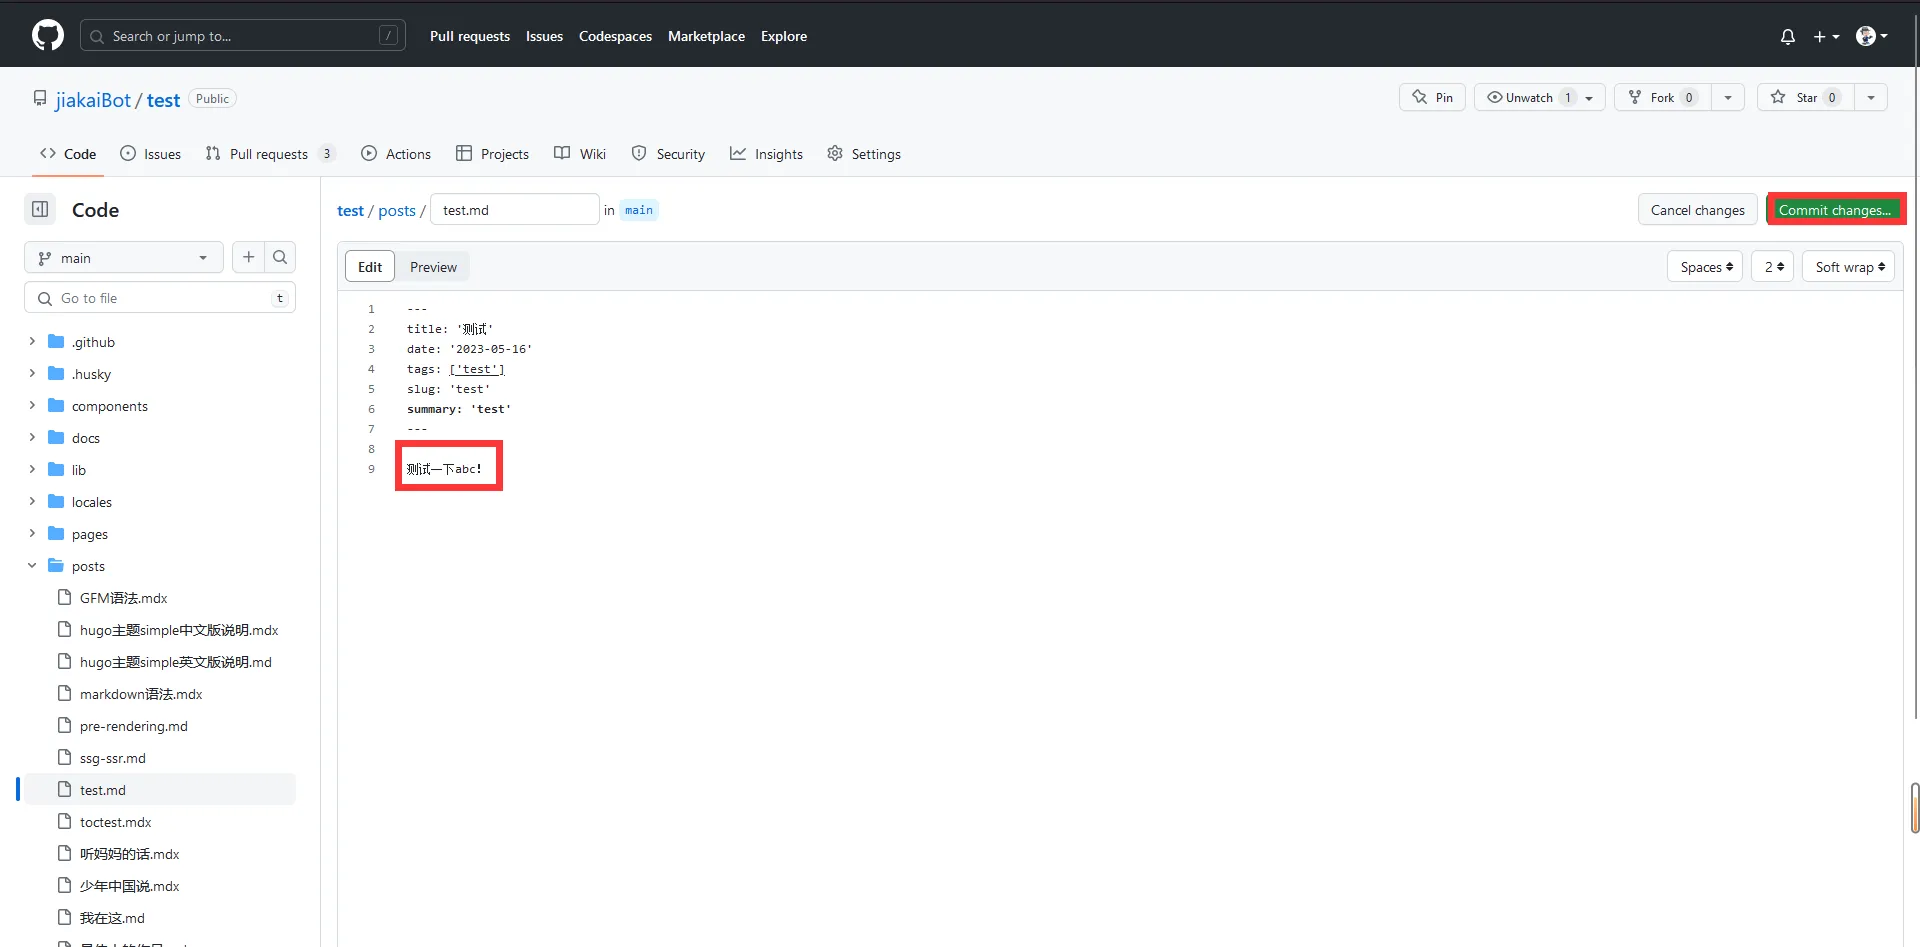
Wait patiently for the vercel build to finish (it takes about 2~3 minutes to build), then come to the article page again to refresh and see the modified article information.
